In this post ill present Flex development combined with the Cairngorm micro architecture & Spring IOC, it should provide an easy stepping point to any Java developer who wishes to get acquainted with the above.
Ill follow along these action items:
- Flex server side setup & Spring related configuration.
- Client side setup including Caringorm, Caringen & FlexBuilder.
- Simple demo application client side walk through.
- Simple demo application server side walk through.
Server side setup
Flex applications may be deployed on any Java container that supports War deployment, in order to keep things simple will stick with
Tomcat.
Flex enabled War contains not only the default folders and files but also Flex configuration files & Jars, an easy way of getting a working skeleton of such a War is by using the
BlazeDS binary distribution (an OSS project which provides the connectivity between Java remote services and Flex RIAs).
All that we need to do is to place the packaged blazeds.war that weve just downloaded into the webapps directory and start tomcat up (bin/./catalina.sh run), tomcat will unpack the War into its exploded form which will use as our base War to work with.
Stop tomcat & take a look at the webapps/blazeds/WEB-INF directory, it contains all the usual files and folders that you might expect with the following exceptions:
- The lib folder contains flex Jars.
- A new flex folder was added it contains flex configuration files.
- Flex servlet & session definitions were added to the web.xml file.
Delete the compressed war (we don't need it anymore), will move on to configure Spring by getting
Spring Jar and placing it into the WEB-INF/lib folder & by adding the following lines to the web.xml file (these will tell tomcat to bootstrap the spring environment):
<context-param>
  <param-name>contextConfigLocation</param-name>
  <param-value>/WEB-INF/applicationContext.xml</param-value>
</context-param>
<listener>
  <listener-class>
    org.springframework.web.context.ContextLoaderListener
  </listener-class>
</listener>
Create the following applicationContext.xml file under WEB-INF:
<?xml version="1.0" encoding="UTF-8"?>
<!DOCTYPE beans PUBLIC "-//SPRING//DTD BEAN//EN" "http://www.springframework.org/dtd/spring-beans.dtd">
<beans>
  <!-- Add your spring beans here -->
</beans>
Now its time to integrate Spring & Flex:
- Download the following zip file & copy the bin/flex folder into the WEB-INF/classes folder, this folder contains a factory class that enables Flex RIAs to access remote Spring managed beans services.
- Add the following lines to flex/services-config.xml file (making Flex aware to the Spring factory):
<services-config>
    <!-- Rest unchanged -->
    <factories>
      <factory id="spring" class="flex.samples.factories.SpringFactory"/>
    </factories>
</services-config>
Client side and Development environment setup
Will use
FlexBuilder eclipse plugin in order to obtain Flex SDK and IDE support (you can use it freely for 60 days), first will create a Flex project with the presented settings:
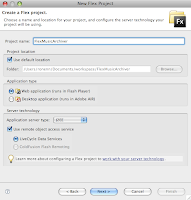
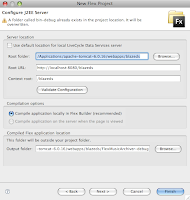
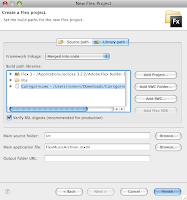
Notice that in the last screen iv imported the
Cairngorm.swc which is an external library (similar to a Jar), Cairngorm provides a structured architecture to use when developing Flex applications (basically conventions that tell what should go where), one of the best introductions to Cairngorm is available on David Tucker's
blog.
In order to make things less tedious will use
Cairngen in order to generate the basic Cairngorm folder & files structure (ala rails), Cairngen is ant based and only requires you to change a small number of properties in the project.properties to get going, for our project will use the following ones (remember to adjust the paths):
################################# PROJECT PROPERTIES ##################################
project.name        =FlexMusicArchiver
root.dir            =/Users/ronen/Documents/workspace/FlexMusicArchiver/src
com.dir             =com
domain.dir          =ronen
project.dir         =MusicArchive
cairngorm.version   =2.2.1

################################# CREATING SEQUENCES ##################################
sequence.name       =GetAlbumList

################################### CREATING VOs ######################################
vo.name             =Album

#################### ENABLE REGISTER REMOTE CLASS META-DATA IN VO #####################
vo.remoteClass      =false

############################### READ / WRITE MANAGEMENT ###############################
overwrite.files     =false
prompt.on.delete    =true

################################## LOG MODIFICATIONS ##################################
log.output          =true

################################ PROTECTED PROPERTIES #################################
namespace           =${com.dir}.${domain.dir}.${project.dir}
project-uri         =${root.dir}/${com.dir}/${domain.dir}/${project.dir}
Simple demo application client side walk through
Fire up ant under Caringen folder, the basic project structure will get generated:
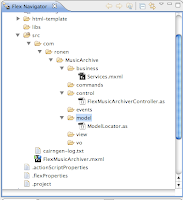
The FlexMusicArchiver.mxml file serves as the main entry point to the application, paste in the following code lines into it:
<?xml version="1.0" encoding="utf-8"?>
<mx:Application
        xmlns:mx="http://www.adobe.com/2006/mxml"
        xmlns:control="com.ronen.MusicArchive.control.*"
        xmlns:business="com.ronen.MusicArchive.business.*"
        layout="absolute" xmlns:view="com.ronen.MusicArchive.view.*">

   <!-- The component that contains remote services declerations-->
   <business:Services/>
   <!-- The application contoler which stores events to commands mappings-->
   <control:FlexMusicArchiverController/>
   <!-- A simple view component-->
   <view:AlbumsList/>

</mx:Application>
Now create a new Flex component named AlbumsList.mxml under the view folder and add in these code lines:
<?xml version="1.0" encoding="utf-8"?>
<mx:Canvas xmlns:mx="http://www.adobe.com/2006/mxml" width="100%" height="100%" >
        <mx:Script>
                <![CDATA[
                import mx.controls.Image;
                import com.ronen.MusicArchive.vo.Album;
                import com.ronen.MusicArchive.events.AlbumsFetchEvent;
                import mx.events.ListEvent;
                import com.ronen.MusicArchive.model.ModelLocator;

                private var  model:ModelLocator=ModelLocator.getInstance();
                private var  currAlbumPath:String;


                private function fetchAlbums(e:MouseEvent){
                        var fetchEvent:AlbumsFetchEvent=new AlbumsFetchEvent();
                        fetchEvent.dispatch();
                }

                private function albumSelected(event:Event){
                        if(event.target.selectedItem!=null){
                          this.currAlbumPath=Album(event.target.selectedItem).coverPath ;
                          this.albumCover.load("http://localhost:8080/blazeds/images/"+this.currAlbumPath);
                        }
                }
                ]]>
        </mx:Script>

<mx:Panel>
 <mx:Grid width="100%" height="100%" borderStyle="solid">
  <mx:GridRow>
    <mx:GridItem>
      <mx:Text id="title" text="A list of all albums:" fontSize="12"/>
    </mx:GridItem>
  </mx:GridRow>

  <mx:GridRow>
    <mx:GridItem>
      <mx:DataGrid id="albums" dataProvider="{model.albums}" change="albumSelected(event)">
       <mx:columns>
         <mx:DataGridColumn dataField="artist" headerText="Artist"/>
         <mx:DataGridColumn dataField="title" headerText="Album title"/>
       </mx:columns>
      </mx:DataGrid>
     </mx:GridItem>

     <mx:GridItem>
       <mx:Image id="albumCover" width="200" height="200"/>
     </mx:GridItem>
  </mx:GridRow>
  <mx:GridRow>
     <mx:GridItem>
       <mx:Button id="fetch" label="fetch albums" click="{fetchAlbums(event)}"/>
     </mx:GridItem>
   </mx:GridRow>
  </mx:Grid>
</mx:Panel>
</mx:Canvas>
This component makes use of a Grid layout to setup its UI components which includes: a DataGrid which is binded to the model.albums list (The Carinagorm ModelLocator idiom is used in order to get a reference to this list), an Image (its source is taken from the albumCover variable) and a fetch albums button that triggers the dispatching of the fetchEvent (the dispatching of the event in the fetchAlbums method is another Cairngorm idiom).
Add in the albums ArrayCollection deceleration to the model/ModelLocator.as file:
package com.ronen.MusicArchive.model
{
 import com.adobe.cairngorm.CairngormError;
 import com.adobe.cairngorm.CairngormMessageCodes;
 import com.adobe.cairngorm.model.IModelLocator;
 import mx.collections.ArrayCollection;

    [Bindable]
    public final class ModelLocator implements IModelLocator{
  public var albums:ArrayCollection;

  /**
   * Defines the Singleton instance of the Application ModelLocator
   */
  private static var instance:ModelLocator;

         public function ModelLocator(access:Private){
    if (access == null){
            throw new CairngormError(CairngormMessageCodes.SINGLETON_EXCEPTION, "ModelLocator" );
           }
    instance = this;
  }

  /**
   * Returns the Singleton instance of the Application ModelLocator
   */
  public static function getInstance() : ModelLocator{
   if (instance == null){
    instance = new ModelLocator( new Private() );
   }
   return instance;
  }
 }
}
/**
 * Inner class which restricts constructor access to Private
 */
class Private {}
This class is a singleton which gives an easy access to model data as we've seen in the AlbumsView component.
Now will head on to and create the events/AlbumsFetchEvent.as class:
package com.ronen.MusicArchive.events
{
        import com.adobe.cairngorm.control.CairngormEvent;

        import flash.events.Event;

        public class AlbumsFetchEvent extends CairngormEvent
        {

                public static const FETCH_ALBUMS:String = "FetchAlbums";

                public function AlbumsFetchEvent(){
                        super(FETCH_ALBUMS);
                }

                override public function clone():Event{
                        return new AlbumsFetchEvent();
                }
        }
}
This class does nothing more than to define the event that will be fired upon the fetch button click in the view, notice that it defines a constant value that will be used in the controller to map the event to its command, lets add the mapping in the control/FlexMusicArchiverController class:
package com.ronen.MusicArchive.control
{
    import com.adobe.cairngorm.control.FrontController;
    import com.ronen.MusicArchive.commands.*;
    import com.ronen.MusicArchive.events.*;

        public final class FlexMusicArchiverController extends FrontController{
                public function FlexMusicArchiverController(){
                        this.initialize();
                }

                private function initialize() : void{
                   this.addCommand(AlbumsFetchEvent.FETCH_ALBUMS,AlbumsFetchCommand);
                }
        }
}
As you can see weve added the mappings in the initialize method to a AlbumsFetchCommand class which we need also to implement, create the following commands/AlbumsFetchCommand.as class:
package com.ronen.MusicArchive.commands
{
        import com.adobe.cairngorm.commands.ICommand;
        import com.adobe.cairngorm.control.CairngormEvent;
        import com.ronen.MusicArchive.business.AlbumsFetchDelegate;
        import com.ronen.MusicArchive.events.AlbumsFetchEvent;
        import com.ronen.MusicArchive.model.ModelLocator;

        import mx.collections.ArrayCollection;
        import mx.rpc.IResponder;

        public class AlbumsFetchCommand  implements ICommand, IResponder{
                public function AlbumsFetchCommand(){
                }

                public function execute(event:CairngormEvent):void {
                  var fetchEvent:AlbumsFetchEvent = event as AlbumsFetchEvent;
                  var delegate:AlbumsFetchDelegate = new AlbumsFetchDelegate( this );
                  delegate.fetchAlbums();
                }

                public function result( event:Object ):void {
                  ModelLocator.getInstance().albums=ArrayCollection(event.result);
                }

                public function fault( event:Object ):void {
                  trace("CONNECTION ERROR");
                }

        }
}
This class implement two Cairngorm interfaces, the first ICommand requires the implementation of the execute method which calls for the AlbumsFetchDelegate fetchAlbums method (the delegate acts as a bridge between the Flex application and the remote services calls, this makes it easy to swap different services implementations without changing command execution logic).
The second one is the IResponder which requires the implementation of the result method, this method will be called upon by the delegate after the service result has been fetched (notice that a reference to the command object is passed to the delegate constructor), now will create the business/AlbumsFetchDelegate.as class:
package com.ronen.MusicArchive.business
{
 import mx.rpc.IResponder;
 import com.adobe.cairngorm.business.ServiceLocator;

 public class AlbumsFetchDelegate{
     private var responder:IResponder;
        private var service:Object;

 public function AlbumsFetchDelegate(responder:IResponder){
   this.responder=responder;
   this.service = ServiceLocator.getInstance().getRemoteObject("fetchAlbums");
        }

        public function fetchAlbums(){
          var call:Object=this.service.fetchAlbums();
          call.addResponder(responder);
          trace('fetch called');
        }
  }
}
This class access the ServiceLocator singleton (registers remote services) in order to get a reference to the fetch albums service, add the following declaration to the business/Services.mxml file:
<?xml version="1.0" encoding="utf-8"?>
<cairngorm:ServiceLocator xmlns:mx="http://www.adobe.com/2006/mxml"
                       xmlns:cairngorm="com.adobe.cairngorm.business.*">

    <mx:RemoteObject id="fetchAlbums" destination="albumsService"/>

</cairngorm:ServiceLocator>
One last class before we can call it off (on the client side) is the vo/Album.as:
package com.ronen.MusicArchive.vo{
   //The com.ronen.musicarchive.AlbumVO tells Flex that Album.as maps to AlbumVO.java
   [RemoteClass(alias="com.ronen.musicarchive.AlbumVO")]
    public class Album{

    public var artist:String;

    public var title:String;

    public var coverPath:String;

    public function Album(){
   }
  }
}
This class gives us a single coherent class to work with inside the Flex view classes without depending on the format which the service returns back (the conversion takes place at the command result method).
Simple demo application server side walk through
Will need to expose & create this service at the server side, will start by adding the following to the WEB-INF/flex/remoting-config.xml file (the file which exposes services to Flex RIAs):
<?xml version="1.0" encoding="UTF-8"?>
<service id="remoting-service"
    class="flex.messaging.services.RemotingService">
    <!--rest unchanged-->
    <destination id="albumsService">
      <properties>
       <factory>spring</factory>
       <!--This is the spring bean id which is declared in the applicationContext.xml file-->
       <source>albumsDao</source>
      </properties>
    </destination>
</service>
The albumsDao is actually the Spring bean id that we are about to create:
package com.ronen.musicarchive;
import java.util.Collection;

public interface AlbumsDao {
  Collection fetchAlbums();
}
Now the implementation:
package com.ronen.musicarchive;
import java.util.ArrayList;
import java.util.Collection;

public class HardCodedAlbumsDao implements AlbumsDao {
    public Collection fetchAlbums() {
     Collection result = new ArrayList();
     result.add(new AlbumVO("the bends", "radio head", "Radiohead.bends.albumart.jpg"));
      result.add(new AlbumVO("MGMT", "latest fav", "MGMT_oracular_spectacular.jpg"));
      return result;
    }
}
The returned VO has to be created:
package com.ronen.musicarchive;

public class AlbumVO {

 private String title;

 private String artist;

 private String coverPath;

 public AlbumVO(){

 }

 public AlbumVO(String title, String artist, String coverPath) {
  this.title = title;
  this.artist = artist;
  this.coverPath = coverPath;
 }

 public String getTitle() {
  return title;
 }

 public void setTitle(String title) {
  this.title = title;
 }

 public String getArtist() {
  return artist;
 }

 public void setArtist(String artist) {
  this.artist = artist;
 }

 public String getCoverPath() {
  return coverPath;
 }

 public void setCoverPath(String coverPath) {
  this.coverPath = coverPath;
 }
}
This simple hard coded DAO dosn't require too much elaboration, just copy the compiled interface and class into the WEB-INF/classes folder, don't forget also to declare the DAO inside the application context file:
<bean id="albumsDao" class="com.ronen.musicarchive.HardCodedAlbumsDao"/>
If you got this far, start tomcat up and launch the FlexMusicArchiver.mxml file (inside eclipse right click Run as->Flex Application), if all went well you should see the application up and running :)
Troubleshooting, make sure that:
- Tomcat has loaded witout any exceptions.
- The Flex SWF compiles without errors.


 Posts
Posts

